
Introduction
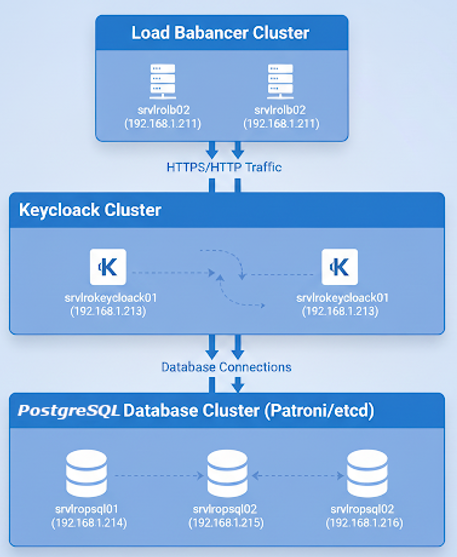
This manual will guide you step by step in implementing a Keycloak server in high availability (HA), an open source identity and access management (IAM) solution. Keycloak will be configured to operate as a cluster, ensuring that the service remains available even if one of the nodes fails.
To achieve data persistence and system robustness, we will use a PostgreSQL database in high availability which we will have already configured following the Red Órbita manuals:
- PostgreSQL Installation Manual in High Availability with Patroni and etcd
- Manual to add a VIP IP in Patroni for PostgreSQL in High Availability
This approach ensures that both the application (Keycloak) and data (PostgreSQL) layers are resilient and scalable.
1. System Preparation
Before installing Keycloak, it is crucial to prepare your server. Make sure you have a Debian or Ubuntu based Linux operating system.
Update repositories and packages
Start by updating your system's software repositories and packages to ensure everything is up to date.
# Actualizar repositorios y paquetes
sudo apt update && sudo apt upgrade -y
Install dependencies
Installs the necessary dependencies for Keycloak and the Java Development Kit (JDK) to work correctly.
sudo apt install -y unzip wget openjdk-17-jdk openssl2. Keycloak User Creation
For security reasons, it is good practice to run Keycloak with a dedicated user instead of root.
Create a system user named keycloak, your home directory and assign the appropriate permissions.
sudo useradd -r -s /bin/bash -d /opt/keycloak keycloak
sudo mkdir -p /opt/keycloak
sudo chown keycloak:keycloak /opt/keycloak
3. Download and Install Keycloak
Now, download the latest version of Keycloak and move it to your installation directory.
Download the Keycloak ZIP file, unzip it and copy its contents to the directory /opt/keycloak. Finally, make sure the user keycloak be the owner of all files.
cd /tmp
wget https://github.com/keycloak/keycloak/releases/download/26.3.3/keycloak-26.3.3.zip
unzip keycloak-26.3.3.zip
sudo mv keycloak-26.3.3/* /opt/keycloak/
sudo chown -R keycloak:keycloak /opt/keycloak
4. PostgreSQL Database Configuration
In this step, you will configure the PostgreSQL database you created previously so that Keycloak can store its data.
Access the PostgreSQL client with the user postgres.
sudo -u postgres psqlOnce inside the client, run the following commands to create a database, a dedicated user and assign the necessary permissions.
-- Crear base de datos y usuario
CREATE DATABASE keycloak_vault;
CREATE USER keycloak_user WITH ENCRYPTED PASSWORD 'SecurePass123!';
GRANT ALL PRIVILEGES ON DATABASE keycloak_vault TO keycloak_user;

-- Dar permisos al esquema público
GRANT USAGE ON SCHEMA public TO keycloak_user;
GRANT CREATE ON SCHEMA public TO keycloak_user;

-- Alternativamente, dar todos los permisos sobre la base de datos
GRANT ALL PRIVILEGES ON DATABASE keycloak_vault TO keycloak_user;

-- Configurar propietario y permisos por defecto
ALTER SCHEMA public OWNER TO keycloak_user;
GRANT ALL ON SCHEMA public TO keycloak_user;
ALTER DEFAULT PRIVILEGES IN SCHEMA public GRANT ALL ON TABLES TO keycloak_user;
5. Creation of Self-Signed HTTPS Certificates
To secure communication between Keycloak nodes and clients, it is essential to use HTTPS. We will generate self-signed certificates for initial configuration.
Create a directory for the certificates and generate a private key and a self-signed certificate with openssl.
sudo mkdir -p /opt/keycloak/certs
sudo chown keycloak:keycloak /opt/keycloak/certs
cd /opt/keycloak/certs

# Generar clave privada
sudo -u keycloak openssl genrsa -out key.pem 2048

# Generar certificado autofirmado
sudo -u keycloak openssl req -new -x509 -key key.pem -out cert.pem -days 365 \
  -subj "/C=ES/ST=Madrid/L=Madrid/O=Redorbita/OU=IT/CN=keycloak.local"

# Ajustar permisos
sudo chown keycloak:keycloak cert.pem key.pem
sudo chmod 600 cert.pem key.pem
6. Keycloak Settings (keycloak.conf)
Now, configure the main Keycloak file to connect to the database, configure the ports, and activate cluster mode.
Edit the configuration file.
sudo -u keycloak nano /opt/keycloak/conf/keycloak.conf
Add the following content, adjusting db-url with the VIP IP of your PostgreSQL cluster and cluster-node-name and frontend-url depending on your environment.
# Database
db=postgres
db-username=keycloak_user
db-password=SecurePass123!
db-url=jdbc:postgresql://192.168.1.217:5432/keycloak_vault
db-pool-min-size=5
db-pool-max-size=20

# HTTP/HTTPS
http-enabled=true
http-port=8080
https-port=8443

# PROXY CONFIGURATION
proxy=xforwarded
proxy-headers=xforwarded
hostname-url=https://keycloak.redorbita.local
hostname-admin-url=https://keycloak.redorbita.local
hostname-strict=false
hostname-strict-https=false
hostname-strict-backchannel=false

# HTTPS Certificates
https-certificate-file=/opt/keycloak/certs/cert.pem
https-certificate-key-file=/opt/keycloak/certs/key.pem

# Cookies
http-relative-path=/

# Clustering
cluster-stack=udp
cluster-node-name=srvlrokeycloak01
cluster-stack-udp-address=230.0.0.4
cluster-stack-udp-port=45700

# Logging para debug
log-level=INFO
7. Service Configuration systemd
To manage Keycloak as a system service, create a unit file systemd. This will allow Keycloak to start automatically when the server boots.
Create and edit the service file.
sudo vi /etc/systemd/system/keycloak.service
Add the following content. The environment variables here override those in the file keycloak.conf and are recommended for easier management of the service.
[Unit]
Description=Keycloak Server
After=network.target

[Service]
Type=simple
User=keycloak
Group=keycloak
WorkingDirectory=/opt/keycloak
ExecStart=/opt/keycloak/bin/kc.sh start
Restart=on-failure
RestartSec=5

[Install]
WantedBy=multi-user.target
Create the Keycloak access user
KEYCLOAK_PASSWORD=SecurePassword123!

sudo -E /opt/keycloak/bin/kc.sh bootstrap-admin user --username admin --password:env KEYCLOAK_PASSWORD
Recharge systemd and enable and start the Keycloak service.
sudo systemctl daemon-reload
sudo systemctl enable keycloak
sudo systemctl start keycloak
8. Service Status Verification
Verify that Keycloak is running correctly and without errors.
sudo systemctl status keycloak
sudo journalctl -u keycloak -f
If the installation is successful, you will see output similar to this:
Keycloak 26.3.3 on JVM (powered by Quarkus) started in ...s
Listening on: http://0.0.0.0:8080 and https://0.0.0.0:8443
Profile prod activated.
9. Initial Access
Once the service is active, you will be able to access the Keycloak interface through the configured ports.
- HTTP:
http://<IP_SERVIDOR>:8080 - HTTPS:
https://<IP_SERVIDOR>:8443(accept self-signed certificate in browser)
10. Configuring NGINX as a Reverse Proxy
To manage traffic more securely and flexibly, we will install NGINX and configure it as a reverse proxy.
Install NGINX
sudo apt update
sudo apt install -y nginx
TLS Certificate Creation
Although Keycloak already has a certificate, it is better to use a dedicated one for NGINX. Generate a self-signed TLS certificate for your domain.
sudo mkdir -p /etc/nginx/certs
sudo openssl req -new -x509 -nodes -days 365 -out /etc/nginx/certs/keycloak.crt -keyout /etc/nginx/certs/keycloak.key \
  -subj "/C=ES/ST=Madrid/L=Madrid/O=RedOrbita/OU=IT/CN=keycloak.redorbita.local"
sudo chmod 600 /etc/nginx/certs/keycloak.*
Configure Reverse Proxy
Create the NGINX configuration file for Keycloa
sudo vi /etc/nginx/sites-available/keycloak.conf
Paste the following content. NGINX will redirect HTTP traffic to port 80 to HTTPS on 443 and act as a proxy for the Keycloak server, which listens on port 8080.
# Define el grupo de servidores Keycloak
upstream keycloak_cluster {
    server 192.168.1.212:8080;
    server 192.168.1.213:8080;
}

server {
    listen 443 ssl http2;
    server_name keycloak.redorbita.local;

    ssl_certificate /etc/nginx/certs/keycloak.crt;
    ssl_certificate_key /etc/nginx/certs/keycloak.key;

    location / {
        # Usar HTTP para comunicación interna
        proxy_pass http://keycloak_cluster;

        # Headers esenciales
        proxy_set_header Host $host;
        proxy_set_header X-Real-IP $remote_addr;
        proxy_set_header X-Forwarded-For $proxy_add_x_forwarded_for;
        proxy_set_header X-Forwarded-Proto $scheme;
        proxy_set_header X-Forwarded-Host $host;
        proxy_set_header X-Forwarded-Port $server_port;

        # WebSocket
        proxy_http_version 1.1;
        proxy_set_header Upgrade $http_upgrade;
        proxy_set_header Connection "upgrade";
    }
}
11. High Availability Configuration for Nginx with Keepalived
To make the load balancer a single point of access and fail-safe, we will use Keepalived. This tool will manage a Virtual IP (VIP) that will always be active on one of the two Nginx nodes (srvlrolb01 and srvlrolb02). If the primary node fails, the backup node will take control of the VIP.
11.1. Installing Keepalived
Install Keepalived on both load balancing servers: srvlrolb01 (teacher) and srvlrolb02 (back).
sudo apt update
sudo apt install -y keepalived
11.2. Configuration on the Master Server (srvlrolb01)
Edit the Keepalived configuration file on the master node.
sudo vi /etc/keepalived/keepalived.confPaste the following content. This configuration will set this node as master
global_defs {
      router_id srvlrolb01
}

vrrp_instance VI_1 {
     state MASTER
     interface ens18
     virtual_router_id 51
     priority 101
     advert_int 1


authentication {
	auth_type PASS
	auth_pass 1111
}

virtual_ipaddress {
	192.168.1.209
	}
}- state MASTER: This node will be the primary one.
- priority 101: A high priority to ensure this node is the master.
- virtual_ipaddress: The virtual IP address that will float between the two nodes.
11.3. Configuration on the Backup Server (srvlrolb02)
Now, configure the backup node. Edit the Keepalived configuration file on the second server.
sudo vi /etc/keepalived/keepalived.confPaste the following content. The configuration is similar to the master, but with state BACKUP and one priority lower.
global_defs {
   router_id srvlrolb02
}

vrrp_instance VI_1 {
    state BACKUP
    interface ens18
    virtual_router_id 51
    priority 100
    advert_int 1

    authentication {
        auth_type PASS
        auth_pass 1111
    }

    virtual_ipaddress {
        192.168.1.209
    }
}- state BACKUP: This node will be the backup node.
- priority 100: Lower priority than master.
11.4. Enable and Start Keepalived
sudo systemctl daemon-reload
sudo systemctl enable keepalived
sudo systemctl start keepalived
Once both files are configured, enable and restart the Keepalived service on both servers.
11.5. VIP Verification
Verify that the VIP has been assigned to the master node (srvlrolb01) by running the following command.
ip aYou should see the virtual IP (192.168.1.209) associated with the network interface.
With this configuration, your Nginx cluster is now redundant and the load balancing service will be protected from single point failures.
Activate Configuration and Restart NGINX
Create a symbolic link to activate the configuration and restart the NGINX service.
sudo ln -s /etc/nginx/sites-available/keycloak.conf /etc/nginx/sites-enabled/
sudo nginx -t
sudo systemctl restart nginx
sudo systemctl enable nginx
Keylock Access
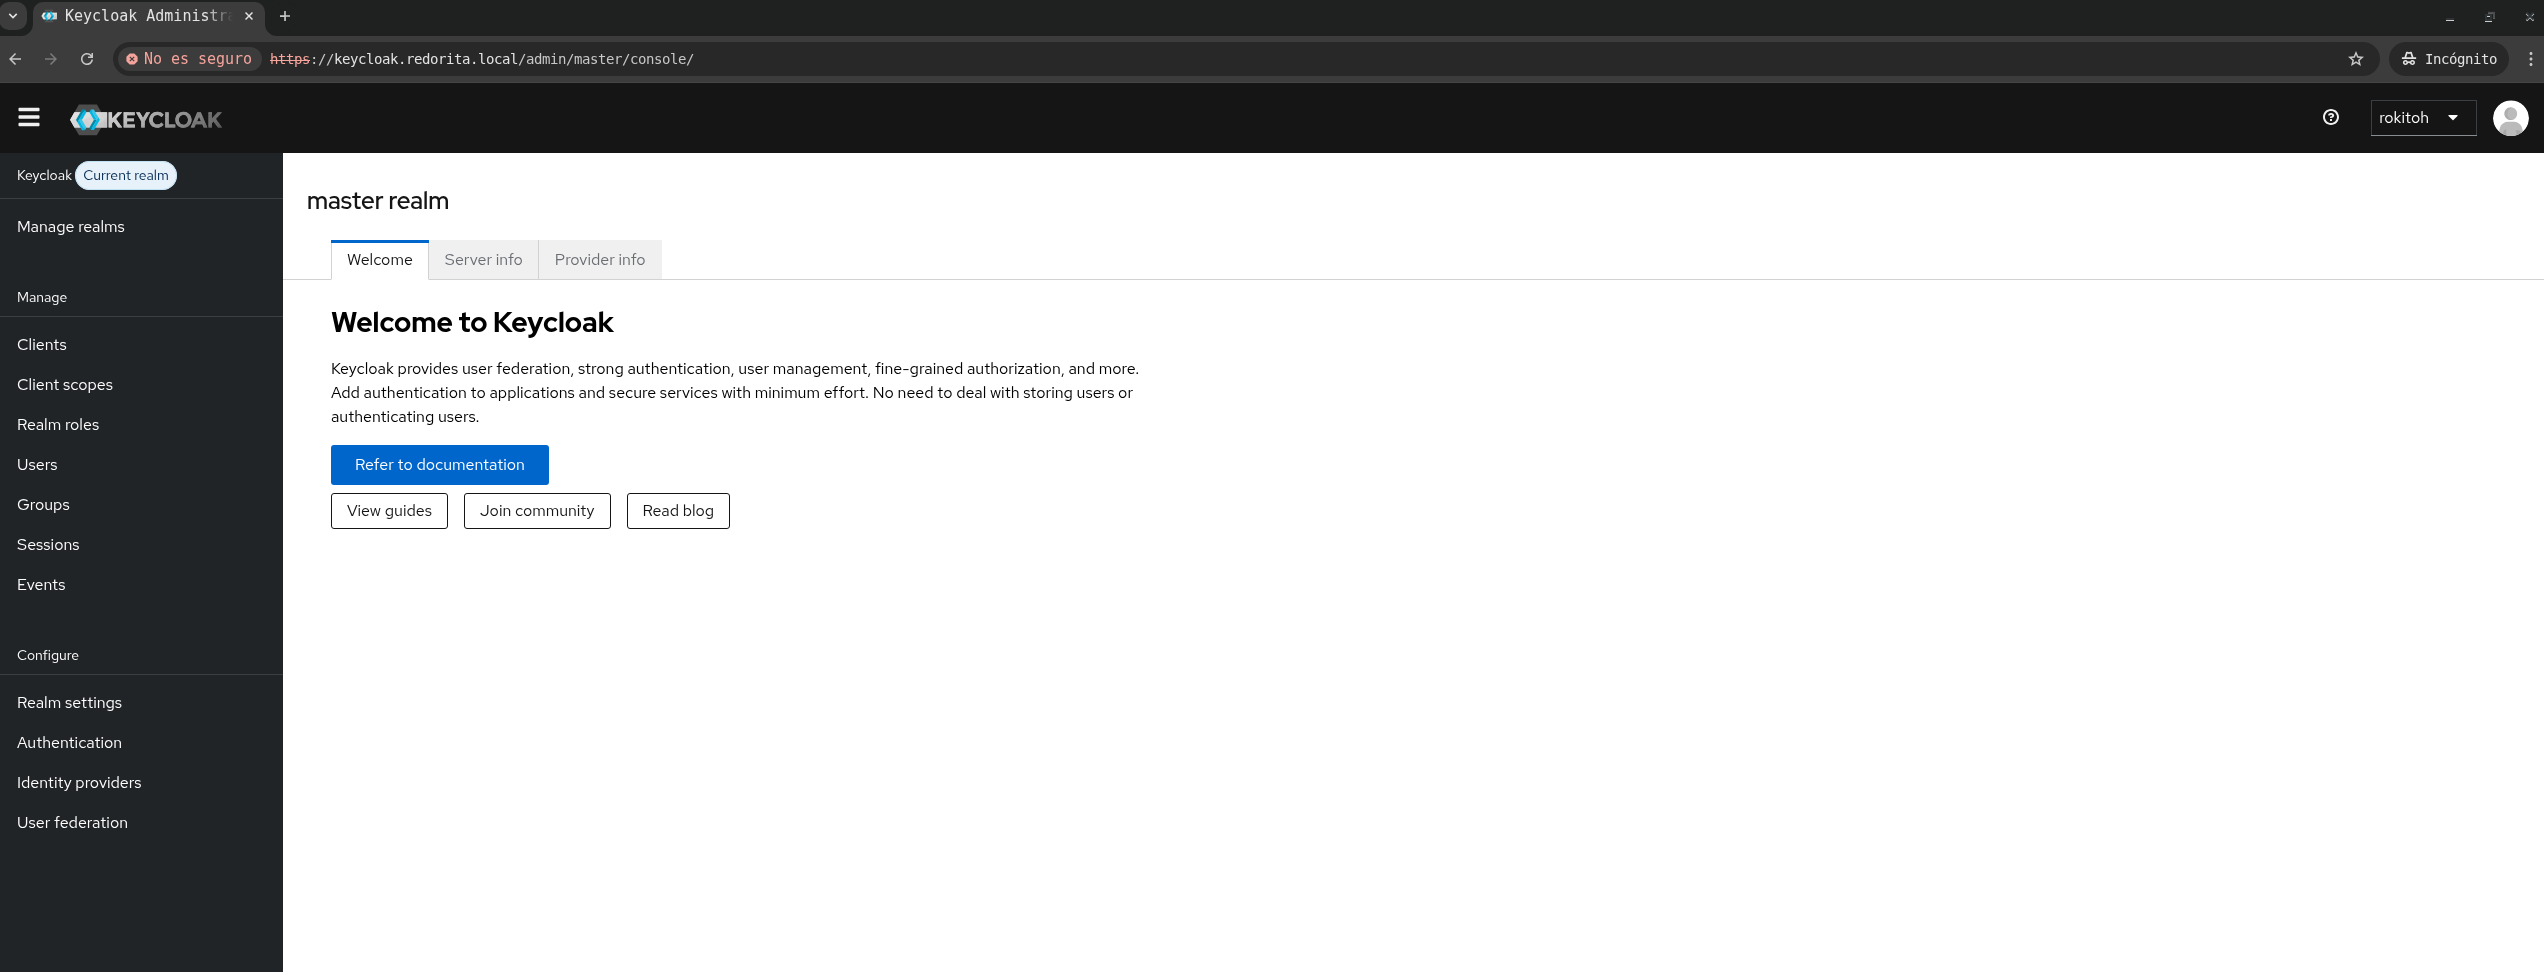
We access the URL configured in Nginx from the browser (in this case: https://keycloak.redorbita.local) and we authenticate ourselves using the credentials we previously generated.
:wq!
Comments