¿Que es un Cluster HA?
Un cluster de alta disponibilidad es un conjunto de dos o más máquinas que se caracterizan por mantener una serie de servicios compartidos y por estar constantemente monitorizándose entre sí. Podemos
Instalar ISCSI
yum -y install iscsi-initiator-utils device-mapper-multipathAñadimos la configuración de multipathd
cat /etc/multipath.conf
defaults {
user_friendly_names yes
path_grouping_policy multibus
path_checker readsector0
failback immediate
}
Reiniciamos el multipathd y lo añadimos al inicio
service multipathd start
Redirecting to /bin/systemctl start multipathd.service
chkconfig multipathd on
Note: Forwarding request to ‘systemctl enable multipathd.service’.
Realizamos el discovery
iscsiadm -m discovery -t st -p 192.168.20.1

192.168.20.1:3260,1 iqn.2010-06.com.purestorage:flasharray

192.168.24.1:3260,1 iqn.2010-06.com.purestorage:flasharray

192.168.20.2:3260,1 iqn.2010-06.com.purestorage:flasharray

192.168.24.2:3260,1 iqn.2010-06.com.purestorage:flasharray

192.168.24.3:3260,1 iqn.2010-06.com.purestorage:flasharray

192.168.20.3:3260,1 iqn.2010-06.com.purestorage:flasharray

192.168.24.4:3260,1 iqn.2010-06.com.purestorage:flasharray

192.168.20.4:3260,1 iqn.2010-06.com.purestorage:flasharray
Realizamos la conexión
iscsiadm -m node -L automaticRescaneamos
iscsiadm -m session –rescanReiniciamos el servicio iscsi
service iscsi restartComprobamos la sesión
iscsiadm -m sesiónComprobamos el multipath
multipath -ll

mpatha (3624a93708731da97f48571620001105a) dm-6 PURE ,FlashArray

size=232G features=’0′ hwhandler=’0′ wp=rw

`-+- policy=’service-time 0′ prio=1 status=active

|- 3:0:0:10 sdb 8:16 active ready running

|- 4:0:0:10 sdc 8:32 active ready running

|- 5:0:0:10 sdd 8:48 active ready running

|- 6:0:0:10 sde 8:64 active ready running

|- 7:0:0:10 sdf 8:80 active ready running

|- 10:0:0:10 sdh 8:112 active ready running

|- 8:0:0:10 sdg 8:96 active ready running

`- 9:0:0:10 sdi 8:128 active ready running
Creamos el volumen
pvcreate /dev/mapper/mpatha

vgcreate vg_mysql /dev/mapper/mpatha

lvcreate -l+100%FREE -n lv_mysql vg_mysql
Damos formato al volumen
mkfs.xfs /dev/mapper/vg_mysql-lv_mysqlAñadimos al /etc/fstab el disco
/dev/mapper/vg_mysql-lv_mysql /mysql xfs defaults 0 0Configuramos el archivo /etc/hosts
192.167.1.235 redorbitaclus02.redorbita.com redorbitaclus02

192.167.1.234 redorbitaclus01.redorbita.com redorbitaclus01
Añadimos la subcripción
subscription-manager list –available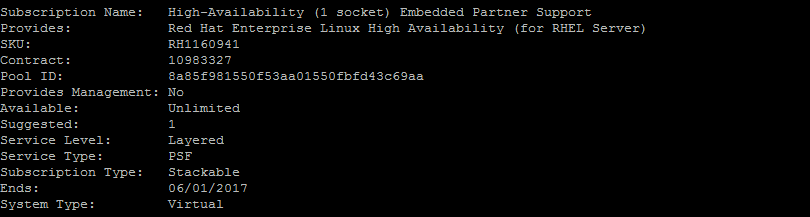
subscription-manager attach –pool=8a85f981550f53aa01550fbfd43c69aa

subscription-manager repos –enable=rhel-ha-for-rhel-7-server-rpms
Instalamos la paquetería necesaria:
yum install pcs fence-agents-allHabilitamos las reglas en el firewall o lo desactivamos
firewall-cmd –permanent –add-service=high-availability

firewall-cmd –add-service=high-availability
systemctl stop firewalld

systemctl disable firewalld
Cambiamos la contraseña al usuario del cluster
passwd hacluster

Changing password for user hacluster.

New password:

Retype new password:

passwd: all authentication tokens updated successfully.
Iniciamos el servicio.
systemctl start pcsd.service

systemctl enable pcsd.service

Created symlink from /etc/systemd/system/multi-user.target.wants/pcsd.service to /usr/lib/systemd/system/pcsd.service.
Autorizar nodos y usuario, realizar en un solo nodo:
pcs cluster auth  redorbitaclus01  redorbitaclus02

Username: hacluster

Password:

redorbitaclus02: Authorized

redorbitaclus01: Authorized
Creamos el cluster y habilitar cluster al iniciar maquinas
pcs cluster setup –start –name redorbitaclus redorbitaclus01 redorbitaclus02

Shutting down pacemaker/corosync services…

Redirecting to /bin/systemctl stop  pacemaker.service

Redirecting to /bin/systemctl stop  corosync.service

Killing any remaining services…

Removing all cluster configuration files…

redorbitaclus01: Succeeded

redorbitaclus02: Succeeded

Starting cluster on nodes: redorbitaclus01, redorbitaclus02…

redorbitaclus01: Starting Cluster…

redorbitaclus02: Starting Cluster…

Synchronizing pcsd certificates on nodes redorbitaclus01, redorbitaclus02…

redorbitaclus02: Success

redorbitaclus01: Success
Restaring pcsd on the nodes in order to reload the certificates…

redorbitaclus02: Success

redorbitaclus01: Success
pcs cluster enable –all

redorbitaclus01: Cluster Enabled

redorbitaclus02: Cluster Enabled
Comprobamos el estatus del cluster
pcs cluster status

Cluster Status:

Last updated: Thu Jun  2 11:58:37 2016         Last change: Thu Jun  2 11:38:40 2016 by hacluster via crmd on redorbitaclus01

Stack: corosync

Current DC: redorbitaclus01 (version 1.1.13-10.el7_2.2-44eb2dd) – partition with quorum

2 nodes and 0 resources configured

Online: [ redorbitaclus01 redorbitaclus02 ]
PCSD Status:

redorbitaclus01: Online

redorbitaclus02: Online
Instalamos el servicio el cual vamos a clusterizar, en nuestro caso mysql.
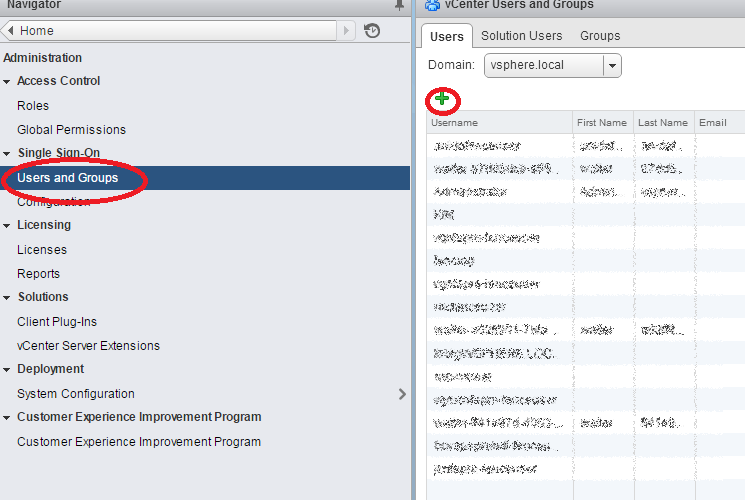
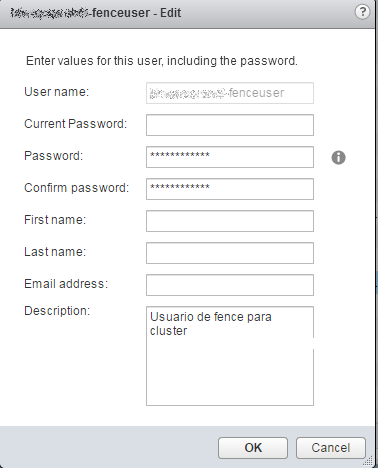
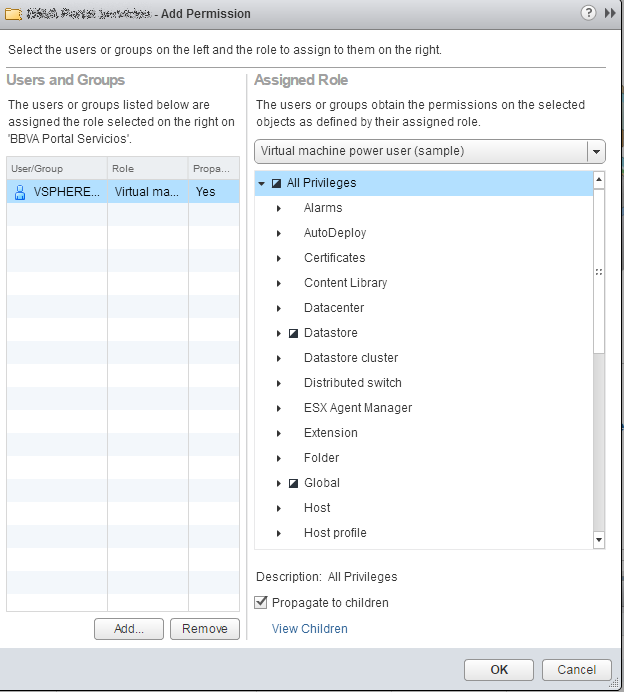
yum install MariaDB-server MariaDB-clientGeneramos el usuario de Fence en vmware, para ello nos vamos a Roles en el vcenter

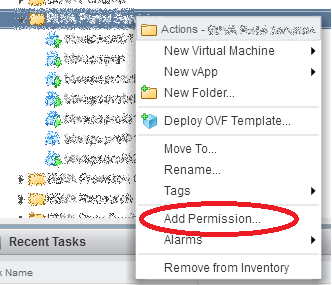
Nos vamos a la carpeta del proyecto, botón detrecho > Add Permission…
Accedemos mediante web por el Puerto 2224
Nos logamos con el usuario hacluster

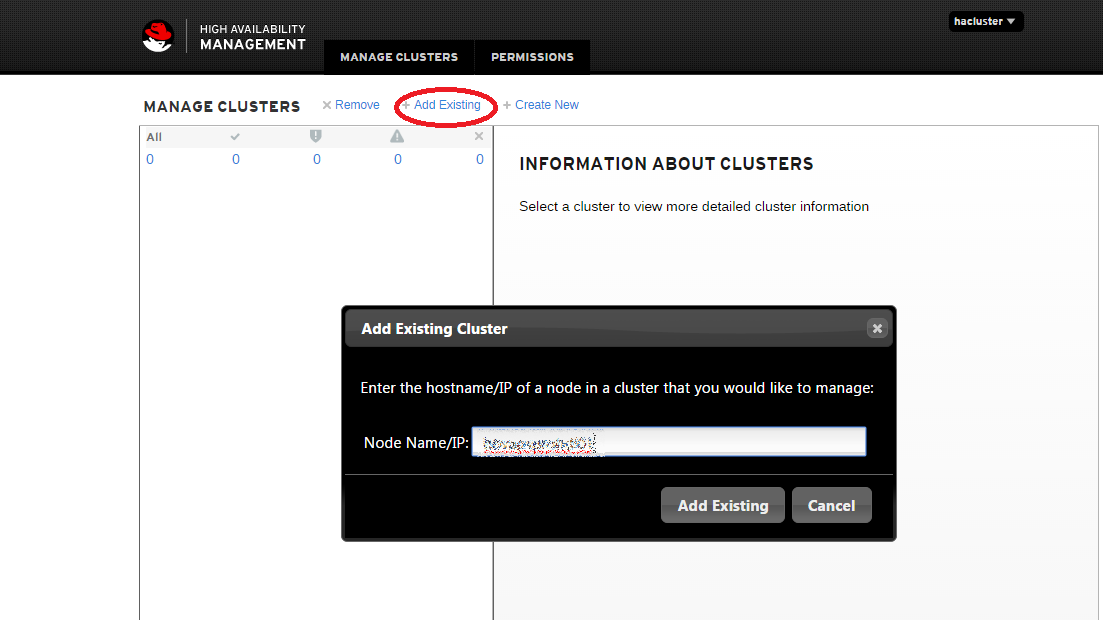
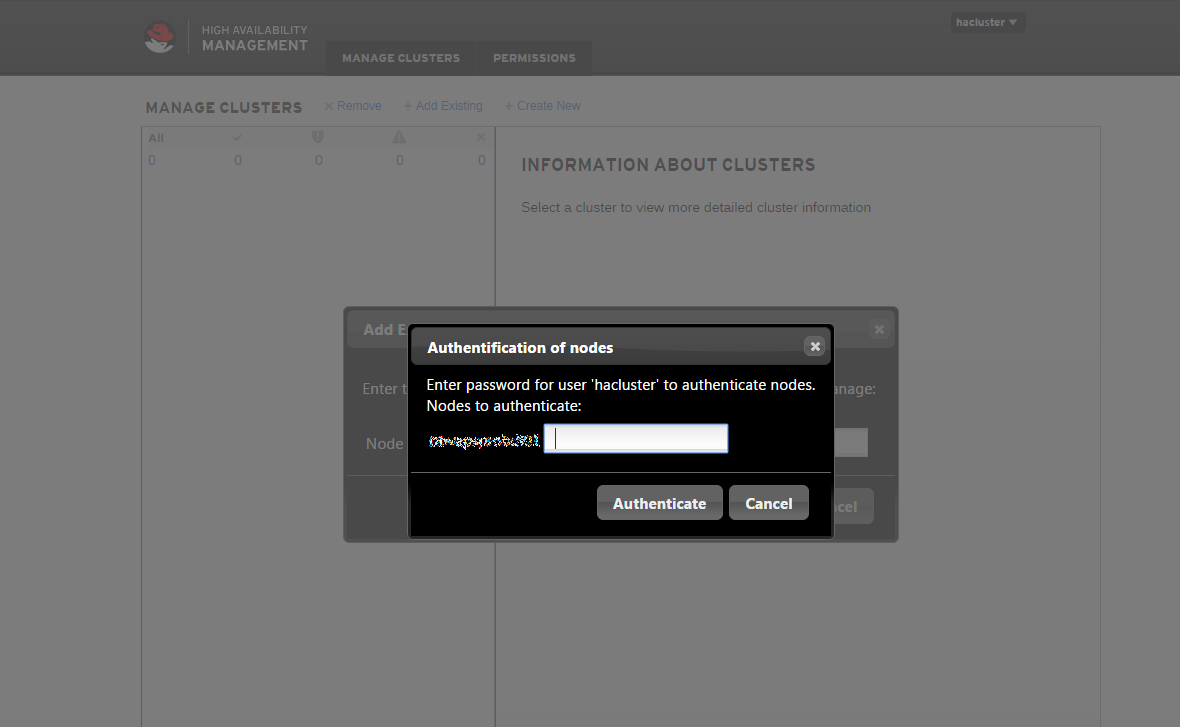
Añadimos el cluster para ser administrado por web.
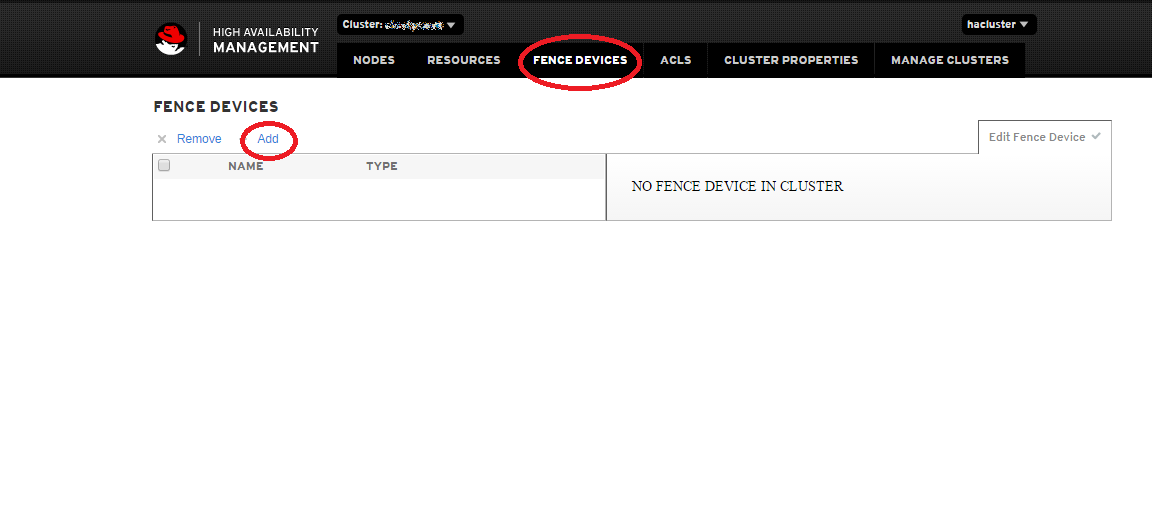
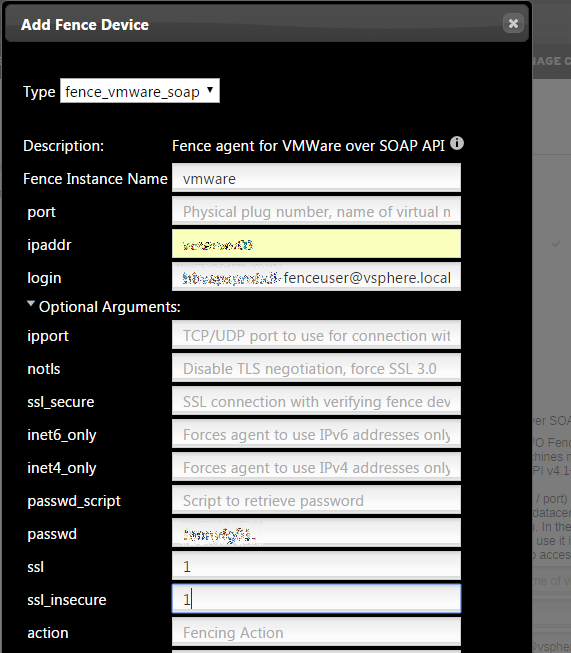
A continuación vamos a configurar el Fence, para ello presionamos en Fence devices > Add
Añadimos la ip o nombre del servidor dns en ipaddr, el usuario que anteriormente hemos creado y la password correspondiente.
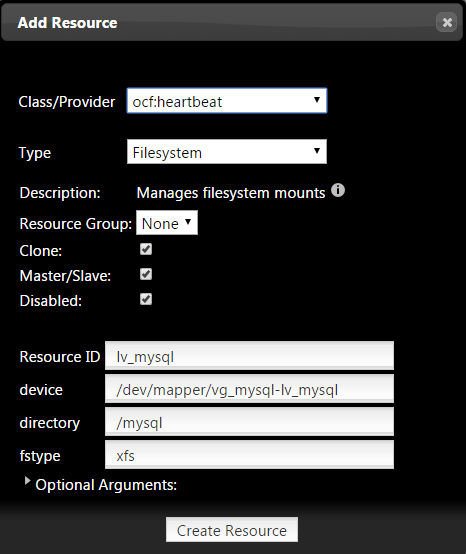
A continuación vamos a crear un recurso Recurces > Add

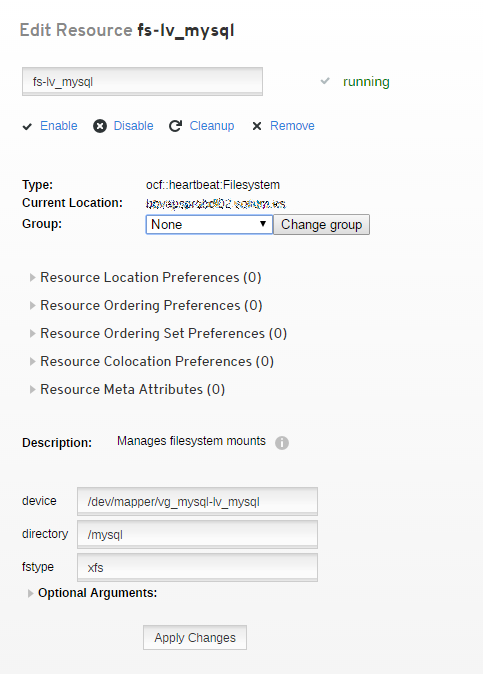
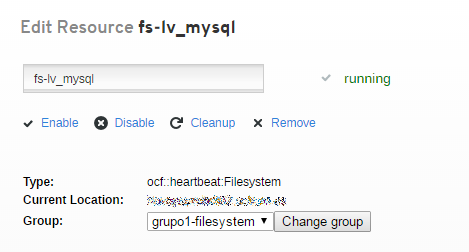
Configuramos un recurso el cual realiza el montaje del file system.
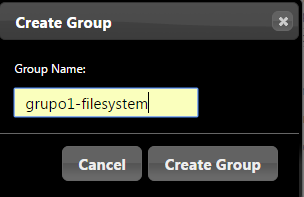
Ahora creamos un grupo y lo asociamos al recurso creado anteriormente.

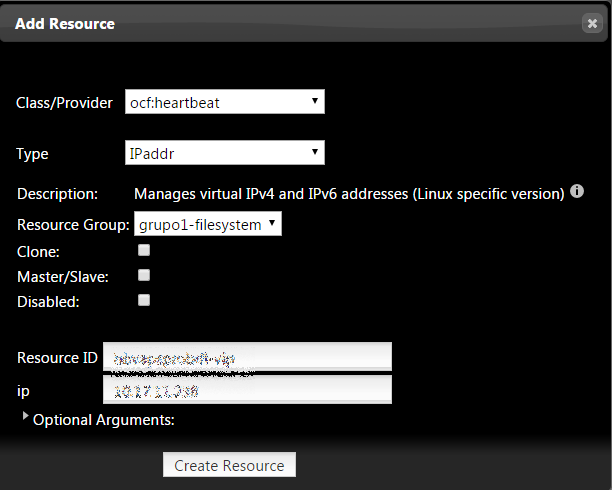
Creamos otro recurso para la ip del cluster
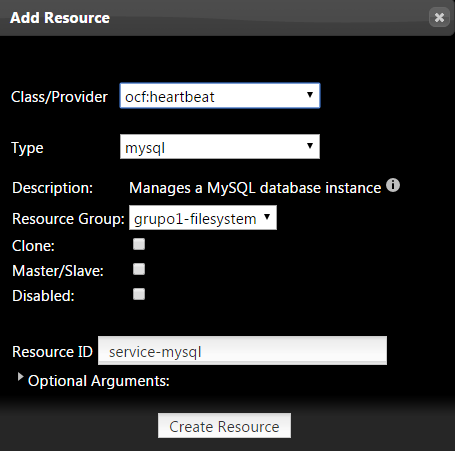
Creamos el recurso para el servicio de mysql

Por ultimo configuramos /etc/my.cnf de nuestro MariaDB-Server
cat /etc/my.cnf
For advice on how to change settings please see

# http://dev.mysql.com/doc/refman/5.7/en/server-configuration-defaults.html
[mysqld]

sql_mode=»STRICT_TRANS_TABLES,ERROR_FOR_DIVISION_BY_ZERO,NO_AUTO_CREATE_USER,NO_ENGINE_SUBSTITUTION»

#

# Remove leading # and set to the amount of RAM for the most important data

# cache in MySQL. Start at 70% of total RAM for dedicated server, else 10%.

innodb_buffer_pool_size = 5G

#

# Remove leading # to turn on a very important data integrity option: logging

# changes to the binary log between backups.

# log_bin

#

# Remove leading # to set options mainly useful for reporting servers.

# The server defaults are faster for transactions and fast SELECTs.

# Adjust sizes as needed, experiment to find the optimal values.

join_buffer_size = 64M

# sort_buffer_size = 2M

read_rnd_buffer_size = 16M

bulk_insert_buffer_size = 64M

#datadir=/var/lib/mysql

innodb_thread_concurrency = 10

innodb_buffer_pool_instances=6

#thread_concurrency = 12

innodb_autoextend_increment = 512

innodb_log_file_size = 1G

read_buffer_size = 2M

datadir=/mysql

socket=/var/lib/mysql/mysql.sock
#skip_grant_tables
# Disabling symbolic-links is recommended to prevent assorted security risks

symbolic-links=0
log-error=/var/log/mysqld.log

pid-file=/var/run/mysqld/mysqld.pid
validate_password_policy=LOW
user = mysql

port = 3306

basedir = /usr

tmpdir = /tmp

language = /usr/share/mysql/english

symbolic-links  =0

max_allowed_packet = 512M

innodb_file_per_table =1

lower_case_table_names = 1

skip-name-resolve=1
# Query Cache #

query_cache_type = 0

query_cache_limit = 32M

query_cache_size = 64M
# For MyISAM #

key_buffer_size = 32M

myisam_sort_buffer_size = 128M

myisam_max_sort_file_size = 10G

#myisam_max_extra_sort_file_size = 10G

myisam_repair_threads = 1
# LOGGING #

log_queries_not_using_indexes = 1

slow_query_log = 1

slow_query_log_file = /var/lib/mysql/mysqld-slow-query.log

log_queries_not_using_indexes = 0
# Caches #

tmp_table_size = 256M

max_heap_table_size = 256M

max_connections = 500

thread_cache_size = 50

open_files_limit  = 5000

table_definition_cache = 4096

table_open_cache = 1024
Iniciamos el cluster
crm_resource start redorbitaclusComprobamos el estado del cluster
pcs cluster status
Cluster Status:

Last updated: Mon Jun 6 15:59:46 2016 Last change: Mon Jun 6 13:36:01 2016 by

hacluster via cibadmin on redorbitaclus01.redorbita.com

Stack: corosync

Current DC: redorbitaclus01.redorbita.com (version 1.1.13-10.el7_2.2- 44eb2dd) – partition with

quorum

2 nodes and 3 resources configured

Online: [ redorbitaclus01.redorbita.com ]

OFFLINE: [ redorbitaclus02.redorbita.com ]

PCSD Status:

redorbitaclus01.redorbita.com: Online

redorbitaclus02.redorbita.com: Online
Un saludo.

Comentarios